Advertisement
Photos
Night Photography: Mastering Low-Light Shots and Long Exposures
Ah, night photography—the art of turning darkness into your canvas. You’ve seen those stunning photos of the Milky Way, shimmering cityscapes, or striking images of neon signs glowing in the night, and thought, “How do they do it?” Fear not, for we’re here to unveil the magic behind mastering low-light shots and long exposures. Get ready to dazzle Instagram followers and wow at the next family gathering!
Why Night Photography?
First, let’s address the elephant—or perhaps the owl—in the room: why bother with night photography in the first place? For starters, the world at night offers a whole new perspective. Familiar scenes transform into something almost magical when painted with the brush of darkness and light. The possibilities are vast—from capturing twinkling stars to bustling nightlife, and even ghostly apparitions in long exposures.
One of the most mesmerizing aspects of night photography is the ability to expose the hidden world that exists in plain sight but remains invisible to our eyes in the darkness. When our pupils cannot gather enough light to see faint stars, a simple camera exposure of several seconds can reveal a breathtaking cosmic tapestry. Likewise, shadows that seem foreboding by day can be dramatically illuminated by streetlights at night, shifting a location’s mood and atmosphere into something altogether new.
Night photography also provides creative freedom that is often more limited during daylight hours. The subdued color palette of the night sky or the neon glow of city lights can guide your aesthetic approach, giving you the opportunity to be bold, experimental, and deeply personal. In short, photographing after dark can help you fall in love with photography all over again—or ignite a new passion if you’re just starting out.
Equipment Essentials: Your Trusted Night-Time Sidekicks
Before embarking on your nighttime escapades, you’ll want to gather the right arsenal of gear. Here are some essentials that will come to your rescue in low-light conditions:
- Camera: While smartphones have impressive capabilities, a DSLR or mirrorless camera will offer better control over settings crucial for night photography. The ability to shoot in RAW and manually adjust shutter speed, aperture, and ISO is a game-changer.
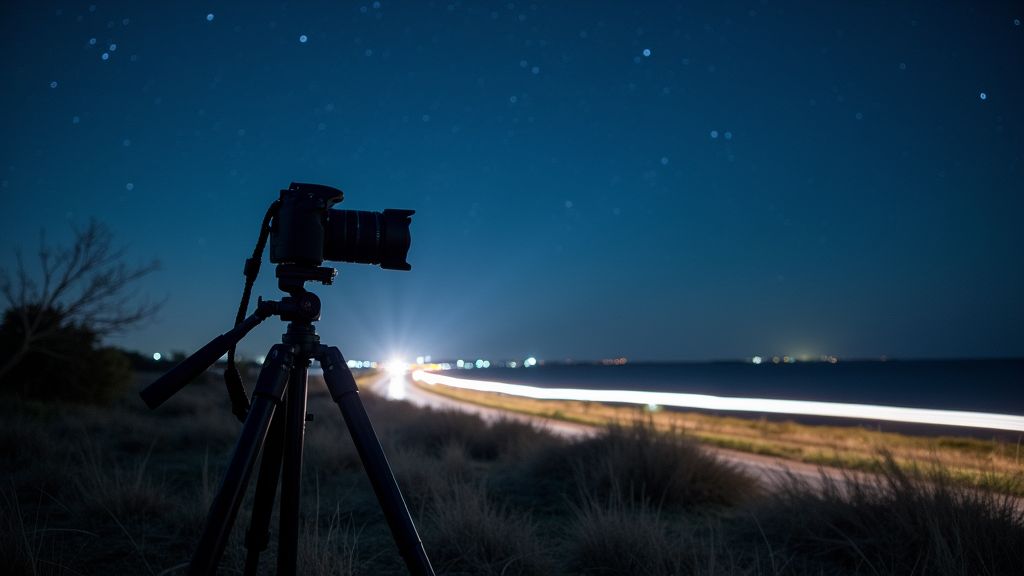
- Tripod: Absolutely essential for stability during long exposures. Even the tiniest hand movement can ruin your shot. Look for one that’s sturdy but manageable enough to carry around.
- Lenses: A fast lens with a wide aperture (f/2.8 or lower) works perfectly in low light. On a budget? The “nifty fifty” (50mm f/1.8) is a great, affordable option! If you’re shooting landscapes or astrophotography, wide-angle lenses can help you capture more of the scene.
- Manual Settings: Embrace your inner control freak by switching to manual mode. You’ll be able to tweak ISO, aperture, and shutter speed to perfection. If Oprah were to give you advice right now, she’d probably say, “You shall not be a victim of Automatic Mode!”
Additionally, don’t forget some smaller—but critical—items. A remote shutter release (or using your camera’s self-timer) will help prevent camera shake. A red flashlight or headlamp will allow you to see your camera settings without ruining your night vision. And, if you’re going to be out in the field for a while—especially for astrophotography—dress warmly and bring snacks! Nothing stalls a good photo session like frozen fingers and a growling stomach.
Key Elements for Jaw-Dropping Night Photos
1. Finding the Perfect Setting
Start by choosing a location that offers compelling subjects, like historical buildings, bridges, or countryside escapes with zero light pollution. A backdrop that tells its own silent story can make all the difference. If you’re shooting stars, it’s vital to scout out locations free from excessive light pollution—apps and websites can help you find the darkest skies near you.
In urban settings, consider vantage points that showcase city lights in an interesting composition. Rooftops, waterfronts reflecting colorful neon signs, or even hidden alleyways with vintage lamp posts can evoke a sense of mystery and drama. Don’t be afraid to explore different areas of your city—or venture beyond your typical comfort zone—to find that one iconic spot that truly comes alive after dark.
2. Understanding Exposure
Exposure in night photography is like figuring out your coffee order—it’s personal and requires some experimenting. Generally, use a longer shutter speed to capture more light, adjust the ISO according to the available light (but try to keep it no higher than 3200 to avoid grainy photos), and use a wide aperture. Depending on your subject, you may need to push your ISO a bit further, but do so sparingly to prevent excessive noise.
A handy rule of thumb for star photography (the “500 Rule”) suggests using a shutter speed of 500 divided by the focal length to prevent star trails when shooting on a full-frame camera. For example, if you’re shooting at 20mm, you might start at around 25 seconds (500 / 20) and adjust from there. On a crop-sensor camera, you’ll need to account for the crop factor accordingly. This is just a starting point—feel free to tweak and experiment!
3. Composition is Key
Don’t be afraid to break the rules, but remember, the rule of thirds is your friend. You can also play with leading lines, symmetry, or frames within frames for added drama. Nighttime elements like passing headlights, illuminated windows, or reflections on wet surfaces offer fantastic opportunities to lead your viewer’s eye through the frame.
“The best way to pay for a lovely moment is to enjoy it.” – Richard Bach
Experiment with negative space, too. A swath of dark sky or a looming silhouette can add a cinematic flair to your shots. Think about the story you want to tell and how the placement of your subject or light source can heighten tension or wonder. Don’t be discouraged if your initial attempts miss the mark—composition is a skill that grows with practice, and the night opens up a wholly unique playground for your creativity.
4. Embrace the Variability
Weather, moon phases, and urban lighting all play vital roles in night photography. Be patient and willing to adapt your settings according to changes in environmental lighting. If the moon is too bright, capturing the Milky Way might be more challenging, so pivot to a different subject—like moonlit landscapes, which can be enchanting in their own right.
Cloud cover, fog, and even light rainfall can add a dramatic flair to your images. The interplay of moisture and artificial lights in the atmosphere can create halos, lens flares, or shimmering ground reflections. Always keep an open mind. A night that seems “ruined” by bad weather can sometimes produce your most ethereal and haunting photos.
Long Exposure: Playing with Time
You’ve nailed the basics, now it’s time to leave your mark with long exposures. Imagine the streaking lights of passing cars or the silky flow of waterfalls. Here’s how you can accomplish such artistry:
- Use a remote shutter or camera timer to avoid shake.
- Set your camera to ‘Bulb’ mode to allow longer exposure times beyond 30 seconds.
- Experiment with neutral density filters during daylight for similar effects.
You always dreamt of being a magician, and there you are, playing with time! Long-exposure photography is truly mesmerizing because it freezes motion in such a way that our eyes can’t perceive in real-time. The resulting image can take on surreal qualities: moving water becomes smooth, clouds stretch across the sky, and city lights become painterly ribbons of color.
To delve even deeper, consider star trails—those graceful arcs of light created by Earth’s rotation. Capturing star trails requires exposures of many minutes or even hours, either in one shot (which can be very noisy) or through stacking multiple shorter exposures in post-processing software. Whichever method you choose, patience and planning are key. Scout a location free from car lights or other ambient interruptions, and ensure you have a fully charged battery (or several spares!).
Focusing in the Dark
One of the trickiest parts of night photography is achieving accurate focus in low-light conditions. Many cameras struggle to autofocus in the dark, leading to fuzzy or out-of-focus shots. To tackle this challenge, switch to manual focus and use your camera’s live view. Zoom in on a bright star or a distant light source, then carefully adjust the focus ring until the point of light is as sharp and small as possible.
If you’re shooting in an urban environment, look for the strongest light source within your desired composition—like a streetlamp, illuminated billboard, or window reflection—to assist with focusing. Once you’ve locked in the right focus, turn off autofocus and be mindful not to bump the lens’s focus ring. Alternatively, some cameras offer focus-peaking aids that highlight the sharpest areas in your frame, making night focusing much more efficient.
Common Pitfalls and How to Avoid Them
Many aspirational night photographers find themselves tangled in a web of blurry images or noise. Here’s a quick checklist to troubleshoot:
- Blur: Double-check that tripod, eliminate movement sources, and utilize timer or remote releases. If you’re on uneven ground, weigh down your tripod or spread the legs wider for more stability. In windy conditions, consider using a lens hood or seeking shelter near walls or large objects to shield your setup.
- Noise: Keep that ISO in check. Post-processing tools can smooth out noise as a last resort, but start with the lowest possible ISO to preserve image quality. Modern noise-reduction software can be a lifesaver, but it often comes at the expense of some detail—so use it judiciously.
- Out of Focus: Use manual focus, exploiting peak focusing tools if available. Always review your images on the camera’s LCD for sharpness before moving on—there’s nothing worse than discovering slightly soft photos after you’ve already packed up and gone home.
Another common issue is lens flare or “ghosting” caused by strong light sources striking the lens directly. In urban settings, bright streetlights can create unwanted artifacts. A lens hood can minimize some of these effects, but sometimes the best solution is to adjust your angle or composition to reduce the glare.
Post-Processing Magic
Shooting at night often calls for some post-processing wizardry to bring out the full potential of your images. Working with RAW files gives you much more latitude in adjusting exposure, white balance, and contrast. Here are some tips for polishing your nocturnal masterpieces:
- White Balance: Night scenes can have varied light sources (streetlamps, neon signs, moonlight), creating color casts ranging from orange-yellow to blue. Adjusting white balance can help harmonize these tones or highlight them for artistic effect.
- Noise Reduction: Use software like Adobe Lightroom or specialized plugins (e.g., Topaz DeNoise AI) to tame high-ISO noise. Dial in just enough noise reduction without sacrificing detail.
- Contrast and Blacks: Night photos can look flat if you don’t reintroduce contrast or deepen blacks. Carefully boost contrast to maintain a sense of depth and drama.
- Dodging and Burning: Selective lightening or darkening can draw attention to important parts of your photo, adding dimension and visual hierarchy.
Be mindful not to overcook the edits. While it’s tempting to crank up saturation or clarity for impact, subtlety often yields a more timeless and refined result. That said, experimentation is key—sometimes a bold, high-contrast look suits the neon vibe of a bustling city, whereas a more delicate approach enhances the serenity of a moonlit landscape.
Night Photography Safety and Planning
Venturing out after dark can be an exhilarating experience, but safety should always be a priority. Make sure you’re well-prepared by doing the following:
- Check the Weather: Night temperatures can drop significantly, so dress warmly and consider extra layers. Also, keep an eye out for sudden changes in weather that might affect your gear or your ability to travel safely.
- Scout Locations in Daylight: If you’re heading to a remote or unfamiliar location, visit during the daytime to identify potential hazards like steep drops, uneven terrain, or restricted areas.
- Bring a Friend: Solo adventures can be peaceful, but having a companion is safer—especially if you need help carrying gear or face an emergency.
- Have a Reliable Light Source: A flashlight or headlamp with a red light setting preserves night vision while allowing you to see your camera controls or where you’re walking.
- Tell Someone: If you’re traveling to a remote location, let someone know where you’ll be and when you plan to return. Better safe than sorry!
Plan your shots using apps or websites that provide crucial data on moon phases, the position of the Milky Way, and weather forecasts. This preparation can be the difference between capturing a once-in-a-lifetime shot and returning home disappointed. The more you plan, the more you can concentrate on creativity once you’re out in the field.
Expanding Your Night Photography Repertoire
Once you’ve grown comfortable with basic low-light and long-exposure techniques, consider branching out into more specialized territory:
- Star Trails and Astrophotography: Already touched on, but you can push further by learning stacking techniques to reduce noise and enhance details. Capture entire timelapses of the stars circling overhead—it’s addictive!
- Light Painting: Use a flashlight or LED wand to “paint” your subject during a long exposure. This can illuminate foreground elements or add artistic flourishes to your images.
- Steel Wool Photography: By spinning burning steel wool in a whisk attached to a chain, you can create stunning sparks of light. Always practice extreme caution and adhere to local regulations—it’s beautiful but hazardous if done irresponsibly.
- Infrared Night Photography: Though less common, modified cameras or infrared filters can open up an otherworldly realm of ghostly trees and glowing skies. This niche style can set your portfolio apart.
Every aspect of night photography teaches you to slow down and engage with your environment differently. There’s an inherent sense of wonder in patiently observing how ambient lights interact with darkness—an experience quite unlike the more fast-paced approach we take in bright sunlight.
Building a Cohesive Night Series
As you begin to build a collection of night photos, you might want to develop a cohesive visual series or theme. Perhaps you focus on city architecture lit up by evening lights, or you capture abandoned rural buildings beneath the stars. Selecting a unifying aesthetic—be it moody black and whites, neon-saturated scenes, or subtle pastel tones—can help your body of work stand out and tell a more compelling story.
Creating a consistent editing approach is another powerful way to unify your shots. For instance, you might apply similar color grading or tonal adjustments to each image in a set, allowing viewers to see the connections among them at a glance. This approach can be particularly effective if you plan to exhibit your work online, in print, or even in a small gallery.
Your Nighttime Adventure Awaits
Now that you’re armed with know-how, it’s time to venture into the darkness and uncover wonders waiting to be captured. Allow nature and artificial light to guide your creativity, remember to ground yourself with each shot, and don’t forget to review your work as you go. A quick glance at the LCD screen or a histogram readout can save you from underexposure or blurry focuses.
Sometimes you’ll find that the first test shots aren’t perfect. You might need to adjust the composition, lengthen the exposure time, or shift focus. Rather than letting frustration creep in, treat each small “mistake” as an essential step toward your final masterpiece. This iterative process—shoot, review, adjust—is where the magic truly happens.
Don’t let the night intimidate you. Try out these tips on your next nocturnal jaunt. Share your results, seek feedback, and explore more photography articles to refine your skills. Who knows, your picture might become the background on someone else’s phone—or better yet, the featured photo in an art exhibit!
Photography Community and Inspiration
As you continue honing your night photography techniques, consider joining local photo clubs or online communities. Platforms like Instagram, Flickr, and dedicated astrophotography forums are excellent places to receive constructive feedback, exchange location tips, and discover creative ideas. Photographers often benefit greatly from collaborative environments, where you can learn about new post-processing approaches or gear recommendations you hadn’t considered.
Additionally, follow the work of renowned night photographers for inspiration. Their portfolios can spark ideas for compositions, color grading, or techniques you might want to try. Study the metadata (like shutter speed, aperture, and ISO) of any publicly available shots you love—while these settings won’t guarantee an identical result, they can give you a ballpark sense of how to approach similar scenes.
Embracing the Unexpected
No matter how meticulously you plan, surprises will inevitably occur during night shoots—malfunctioning equipment, unexpected weather, or random wildlife encounters that may leave you more exhilarated than frightened. Embrace these twists and turns; sometimes the best photos arise from spontaneous adjustments and new opportunities. If a sudden fog rolls in, lean into that eerie atmosphere. If car headlights intrude on your composition, try creating light trails that enrich your scene rather than ruin it.
Night photography, after all, is as much about the experience as it is about the final image. The hush of a sleeping city, the rustle of nocturnal creatures in a forest, or the distant hum of highway traffic beneath a sky scattered with stars—these are sensory elements that feed your creativity. Let them guide your camera’s eye as much as your carefully laid plans do.
Final Thoughts on Mastering the Night
Learning to see—and capture—the hidden beauty of the night can transform your photography journey. The slow, deliberate pace demands patience, but it also rewards you with images that transcend what’s typically possible in daylight. Whether you’re chasing the Milky Way across a clear sky or highlighting the vibrant nightlife of your favorite urban hub, each photo tells a tale of perseverance, vision, and your unique perspective on the world after dark.
Armed with a tripod, a reliable camera, a sense of curiosity, and the tips outlined above, you’re well on your way to capturing jaw-dropping night photos. Be sure to celebrate every milestone—whether it’s your first sharp starfield or a perfectly executed light trail of passing cars. These accomplishments become stepping stones to even more ambitious images.
So, get out there and explore the luminous side of the night. There’s magic waiting in every long exposure, every shimmering star, every neon reflection rippling across a deserted street. By mastering these techniques, you’re not just taking photos; you’re engaging in a timeless dance with light, motion, and the quiet mysteries of the darkness.

