Advertisement
Photos
Creative Photo Editing: Transforming Your Images with Digital Tools
Have you ever snapped what you thought was the perfect photo, only to realize later that it wasn’t exactly what you envisioned? Perhaps your dog’s tail got mysteriously chopped off, or Aunt Edna’s infamous photobomb made another unexpected appearance at your family reunion. Don’t worry, you’re not alone! Photo editing can turn those okayish snapshots into something spectacular. Welcome to the magical world of creative photo editing, where digital tools are your new best friends!
In this article, we’re diving into the realm of photo editing to arm you with the know-how to enhance your images, whether you’re an aspiring photographer or just looking to impress your Instagram followers. Expect to discover essential tools, ingenious tricks, and some sneaky shortcuts that are sure to make your photos pop! We’ll also delve into why photo editing has become such a popular aspect of digital creativity, a bit of its fascinating history, and how you can balance making your images shine with keeping them authentic. Let’s embark on this digital adventure together!
Why Edit Your Photos?
Let’s start with why you should even bother with photo editing in the first place. Sure, you could post your photo as it is, but photo editing offers a ton of benefits, such as:
- Enhancing Visual Appeal: Bring out the colors, textures, and details that might not be apparent at first glance. By refining the highlights and shadows, you can draw attention to important parts of your image, creating photos that grab your viewers’ eyes from the get-go.
- Correcting Imperfections: Fix lighting issues, remove blemishes, or adjust awkward angles. Nobody wants that strange shadow lurking in the background or a color cast that makes everything look a tad too yellow or green.
- Crafting Artistic Expressions: Transform your image into a work of art reflecting your creative vision. Whether you’re aiming for a surreal effect, an old-fashioned black-and-white film vibe, or a futuristic neon look, editing tools can help you get there. You’re the artist, and your photo is your canvas.
Beyond these fundamental reasons, editing provides you with a greater sense of control over how your final image looks. This is especially relevant in an age where the visual mediums of social media and online portfolios define much of our personal and professional presence. Even if you aren’t a professional photographer, having polished, thoughtful images can elevate your online persona, accentuate the story you want to tell, or simply make you smile when you look back at your favorite memories.
Historically, photo editing is almost as old as photography itself. In the days of film, photographers would spend hours in darkrooms using chemicals, exposure times, and masking techniques to manipulate prints. Dodging and burning, now a familiar term in digital editing, originally referred to physically blocking or adding light to specific areas of photographic paper during exposure. Today, with the tools just a click away, it’s no wonder photo editing is more accessible and exciting than ever before.
Step-by-Step Guide to Editing
Now that we’ve covered the “why,” let’s focus on the “how.” You don’t need to be a Photoshop wizard to start editing your photos effectively. Here’s a basic checklist to guide you through the process:
- Choose Your Software: Popular options include Adobe Lightroom, Photoshop, and free alternatives like GIMP or Snapseed. Each program offers unique features. Lightroom, for instance, is known for its excellent organizational capabilities and nondestructive editing workflow, while Photoshop excels at detailed retouching and layer-based compositions. If you’re on a mobile device, apps like VSCO or Snapseed offer powerful features on-the-go.
- Understanding Layers and Masks: If you’re venturing into software like Photoshop or GIMP, layers allow you to make edits on top of your original image without permanently altering it. Masks let you apply those edits selectively, so you can lighten just one part of the image or sharpen specific elements without affecting the rest. Think of layers as transparent sheets stacked on top of your photo, and masks as the stencils you use to reveal or hide certain parts.
- Making Basic Adjustments: Tweak brightness, contrast, and saturation to bring more life and vibrancy to your image. Start small—often, you’ll be surprised at how a subtle increase in brightness or a minor bump in contrast can revitalize an otherwise dull photo. If your image has poor white balance or an odd color cast, adjusting temperature and tint can make a world of difference.
When beginning, it’s helpful to make a habit of cataloging or sorting your photos before you jump into editing. Create folders on your computer or use a program like Lightroom to organize by date, event, or subject. That way, you can quickly locate the shots you want to work on. This step may sound tedious, but effective organization saves you time and frustration in the long run.
Expert Tip: Keep it Natural
“Always aim to preserve the essence of the scene while enhancing its beauty. Over-editing can lead to unrealistic and artificial results.” – Jane Doe, Professional Photographer
As Jane Doe suggests, striking the right balance is crucial. If you ever find yourself over-editing or cranking the saturation up too high, take a step back. The natural environment in a photo can be as compelling as any dramatic effect. One trick is to periodically look away from your screen for a few seconds. When you look back, you’ll have a fresher perspective on whether your edits are still balanced or if they’ve gone too far.
Transform with Advanced Techniques
Once you’ve mastered the basics of cropping, adjusting brightness, contrast, and basic color settings, you may want to step into more advanced territory. This is where you can really transform your images in a way that feels professional and polished. Below are a few popular techniques that can add new dimensions to your photographs.
Dodging and Burning
This technique sounds like something out of a miniature battle plan, but it’s all about adding depth and dimension to your photos by lightening (dodging) or darkening (burning) certain areas. In the days of darkroom photography, this was done by physically blocking or exposing parts of the photo paper. In the digital realm, software tools let you paint on brightness or darkness with brushes. By carefully applying dodging and burning, you can guide the viewer’s eye through the image, emphasizing faces, objects, or textures that deserve the spotlight.
For instance, if you have a landscape photo with dramatic clouds, you might “burn” the darker portions of the sky to enhance the stormy atmosphere while “dodging” the sunlight spilling onto a field to create contrast and draw interest to that focal point. The trick is subtlety—too much dodging and burning can lead to an overcooked look that screams “edited,” pulling people out of the immersion.
Frequency Separation
A somewhat intricate yet impressive technique primarily used in portrait retouching, frequency separation allows you to separate and independently adjust textures and colors. Imagine you have a portrait where the subject’s skin tone is slightly uneven, and you’d like to even it out without losing the fine pores or natural markings that define someone’s real-life appearance.
Frequency separation does exactly that. By splitting the photo into two separate “frequencies”—one containing the color data (low frequency) and another containing the textural details (high frequency)—you can target each layer independently. This means you can smooth out skin tones on the low frequency layer and address blemishes or wrinkles on the high frequency layer without making everything look waxy or washed out.
Fun Fact: The term “frequency” here doesn’t involve tuning into your radio but rather refers to the different levels of detail and color in your image!
Color Grading and Creative Filters
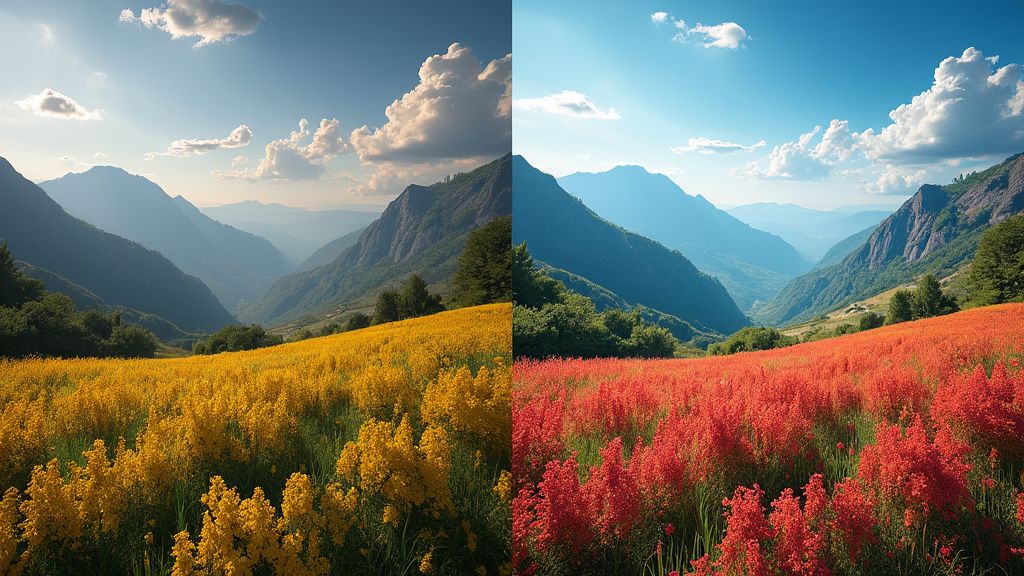
If you watch movies, you may notice how the overall color palette sets the tone of each scene—cool blues for sad or dramatic sequences, warm yellows for nostalgic flashbacks, or vivid bursts of color for high-energy action. Applying that same concept to your photos can drastically change their emotional resonance. Programs like Lightroom have “profiles” or “presets” that you can use as a starting point for your color grading adventures. Similarly, Photoshop and many mobile apps let you apply color looks or filters easily.
Color grading isn’t just about throwing on a filter and calling it a day, though. It’s about fine-tuning shadows, midtones, and highlights to achieve a balanced yet artistic look. You might push blues into your shadows to create a moody vibe or highlight reds in your midtones to give a photo a warm, romantic feel. Just remember that a little goes a long way. Overdo it, and you might find your image drifting into a heavily stylized realm that no longer feels genuine.
Retouching with Precision
Portrait photographers often spend a lot of time retouching images, particularly when they’re dealing with close-up headshots or beauty photography. While the goal may be to minimize distractions like temporary blemishes or stray hairs, you don’t want to erase every sign of life from your subject’s face. The “perfect” face with no visible pores or lines can appear plastic and alien. Tools like the healing brush, clone stamp, and patch tool let you address minor flaws effectively.
Even for everyday snapshots, retouching can come in handy. Perhaps you want to remove that exit sign glaring in your background or eliminate a random piece of trash on the sidewalk. By selectively retouching these distractions, you can keep the viewer’s focus exactly where you want it—on the main subject of your photo.
Addressing Common Concerns
“Isn’t photo editing just for professionals?”
Nope! Thanks to user-friendly software and a plethora of online tutorials (hello, YouTube!), anyone can master the basics with a little practice. If you’re just starting, free tools such as GIMP or mobile apps like Snapseed and Lightroom Mobile have intuitive interfaces that guide you through the process. Even social media platforms now offer basic editing features, making it easier than ever to dip your toes into the world of photo manipulation.
“I’m afraid of overdoing it. How can I keep things natural?”
Less is often more. Apply effects sparingly and frequently compare edits with the original image to maintain authenticity. A quick side-by-side comparison between the original and edited version can reveal if you’ve strayed too far. You can also reduce the “opacity” of a particular effect or layer to dial things back slightly.
Balancing Creativity and Authenticity
Remember, your photos are your story. While editing offers the chance to improve or modify shots, preserving the genuine feel and intended message of your image is key. Use your creative flair wisely! Ask yourself: does this edit improve my photo or distract from the subject? Am I enhancing the moment or rewriting it?
Sometimes, it helps to consider the context in which you’re sharing your photos. If your goal is editorial or journalistic integrity, heavy manipulation that changes the scene’s factual content is discouraged. However, if you’re aiming for fine art or creative expression, you can push the boundaries a bit more. The key is clarity about your intention. While a heavily edited fantasy landscape can be breathtaking, it might not belong in a news article intended to convey real events.
Editing for Different Platforms
One aspect often overlooked by beginners is that different platforms—Instagram, Facebook, or even a professional photography portfolio site—may require different editing approaches or aspect ratios. Some social media apps apply additional compression or alter color profiles when you upload images, which can slightly alter how your photos appear to viewers. To counteract this, check recommended aspect ratios and resolutions before finalizing your edit. For example, if you know your audience will be mostly on Instagram, consider editing with a 4:5 aspect ratio in mind, or square if that’s your preference.
Additionally, if you’re posting on a professional site or printing your images for a gallery, you’ll likely need higher resolution files, consistent color management, and possibly a different set of retouching standards. A subtle and refined look might work better than a highly filtered style if you’re aiming to showcase skill and realism. Think about where your work will live, and tailor your approach accordingly.
Lastly, keep file format in mind. For online sharing, JPEG files at a moderate compression often do the trick. However, if you anticipate printing or further editing down the line, consider saving in a high-quality TIFF or PSD format to retain the maximum amount of detail.
Ethical and Moral Considerations
In the modern era of social media, there’s growing awareness about the ethics of photo manipulation. Overly edited images in advertisements or on social platforms can foster unrealistic standards of beauty and life. While the power to transform images can be exciting, it’s also worth thinking about what kind of narrative your edits might project. If you’re removing a large portion of the scene or heavily altering someone’s features, consider the ethical implications and potential impacts on viewers.
Many photographers and influencers now promote transparency in their editing process, sometimes even showcasing “before and after” comparisons to educate viewers on what was changed. Striking a balance between creative freedom and honesty can cultivate trust and credibility among your audience.
Summing it All Up
Photo editing is not just about correcting flaws—it’s about enhancing your creative vision and producing images that pack a punch. The canvas is yours, and with the right tools and tips we’ve shared, there are endless possibilities. From basic tweaks in brightness and contrast to advanced maneuvers like frequency separation, the world of digital editing offers something for every skill level.
As you gain confidence, challenge yourself with new techniques. Maybe you’ll explore compositing multiple photos into a single image for a surreal effect, or perhaps you’ll perfect the art of subtle retouching for flawless portraits that still look authentic. Keep in mind the importance of staying organized, practicing moderation, and respecting the authenticity of your subject. After all, sometimes the raw essence of a photograph is its most captivating aspect.
Now that you’re armed with fresh insights, it’s time to take those photo-editing skills for a spin. Why not challenge yourself to transform a snapshot today? Don’t hesitate to experiment—try out new filters, play with color grading, or dabble in advanced layering. If you’re feeling especially adventurous, gather a collection of images taken at different times of day and see how editing can unify them into a cohesive series. By sharing your ‘Before & After’ shots online or with friends, you can get valuable feedback, spark meaningful conversations about editing, and inspire others to develop their own visual storytelling.
Whether you’re a hobbyist who wants to spruce up your travel photos or a budding professional aiming to build a stellar portfolio, your journey in photo editing can be as unique and exciting as you make it. Embrace curiosity, keep learning from the wealth of resources available, and most importantly, enjoy the process!

